How to Properly Measure Thermal Image Drift in 2D Cameras
The Importance of Accurate Thermal Drift Measurements
In precision imaging applications, even minor temperature variations can cause significant distortions in captured images. This phenomenon, known as thermal image drift, is the result of thermal expansion affecting the optical and mechanical components of a camera system. To ensure reliable performance in machine vision, scientific imaging, and industrial monitoring, it is crucial to measure and compensate for these temperature-induced distortions correctly.
The Right Approach to Measuring Thermal Drift
Thermal drift cannot be assessed arbitrarily; it requires meticulously controlled conditions [1]. Several key factors must be considered when designing a proper test setup:
- Isolated Temperature Control – The camera under test should be the only component subjected to temperature changes. External factors like fluctuating ambient temperature or unstable mounting structures can introduce errors.
- Stable Reference Artifact – The object used as a reference artifact for measuring image drift must remain thermally stable. Ideally, it should be made of materials with minimal thermal expansion, such as invar or glass, or have its deformation precisely characterized and compensated.
- Rigid Mechanical Structure – The positioning of the camera relative to the reference artifact must be absolutely fixed. Any structural deformations due to temperature changes will compromise measurement accuracy.
- Uniform Lighting Conditions – Illumination changes can affect image processing and the detection of characteristic points in an image. Consistent, controlled lighting is necessary to avoid artifacts that could be mistaken for thermal drift.
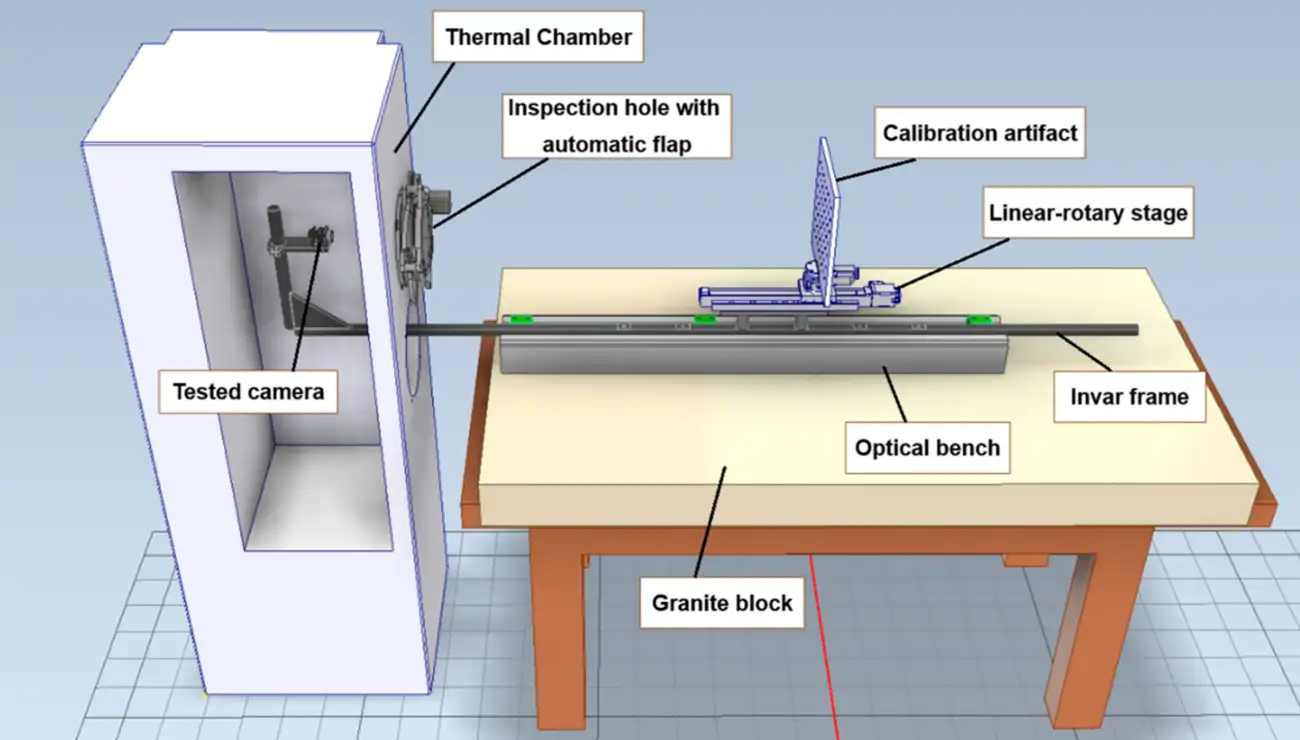
- Automated Data Collection – Measurement setups should be automated to minimize human interference and ensure repeatability over extended test durations. This is particularly important for long-term drift studies. To achieve these conditions, a specialized test stand has been developed, as shown in Figure 1.
A Patented Measurement Method
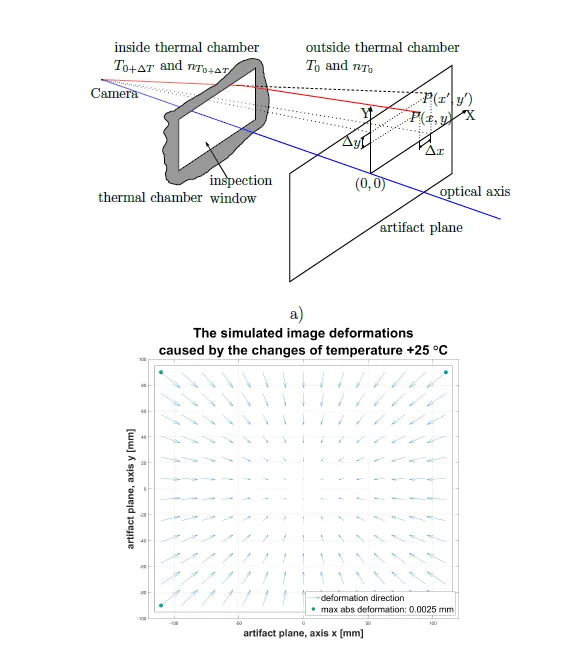
Our research has introduced a specialized test stand designed to eliminate extraneous variables and provide highly reliable thermal drift measurements. The method, described in our publication, proposes a dedicated thermal chamber that isolates temperature variations to the camera while keeping the reference artifact thermally stable. The camera is mounted on an invar frame to prevent positional shifts due to thermal expansion (see Figure 1). Additionally, a verification process ensures that any measured drift is indeed caused by thermal effects within the camera itself and not external environmental influences. This innovative approach is not only scientifically validated but also subject to a patent application, ensuring that the methodology remains a protected intellectual asset. The geometric configuration of the test stand, which accounts for refractive index changes in air due to temperature variations, is illustrated in Figure 2.

Figure 1. Schematic view of the designed test stand with a thermal chamber and invar frame. The invar frame ensures rigidity and eliminates structural deformations due to temperature variations.

Figure 2. The geometric model of the test stand, showing the influence of air refractive index changes due to temperature differences inside and outside the thermal chamber.
Why Proper Measurement Matters
Inadequate test setups can lead to misleading results, incorrect compensation models, and ultimately, unreliable imaging systems. By adhering to best practices and leveraging the patented methodology we propose, engineers and researchers can obtain accurate thermal drift data, enabling robust compensation algorithms for real-world applications. For a more detailed discussion of this methodology, refer to our publication [1].
references:
[1] Nimura, K.; Adamczyk, M. Methodology for Designing an Optimal Test Stand for Camera Thermal Drift Measurements and Its Stability Verification. Sensors 2022, 22(24), 9997. https://doi.org/10.3390/s22249997.


